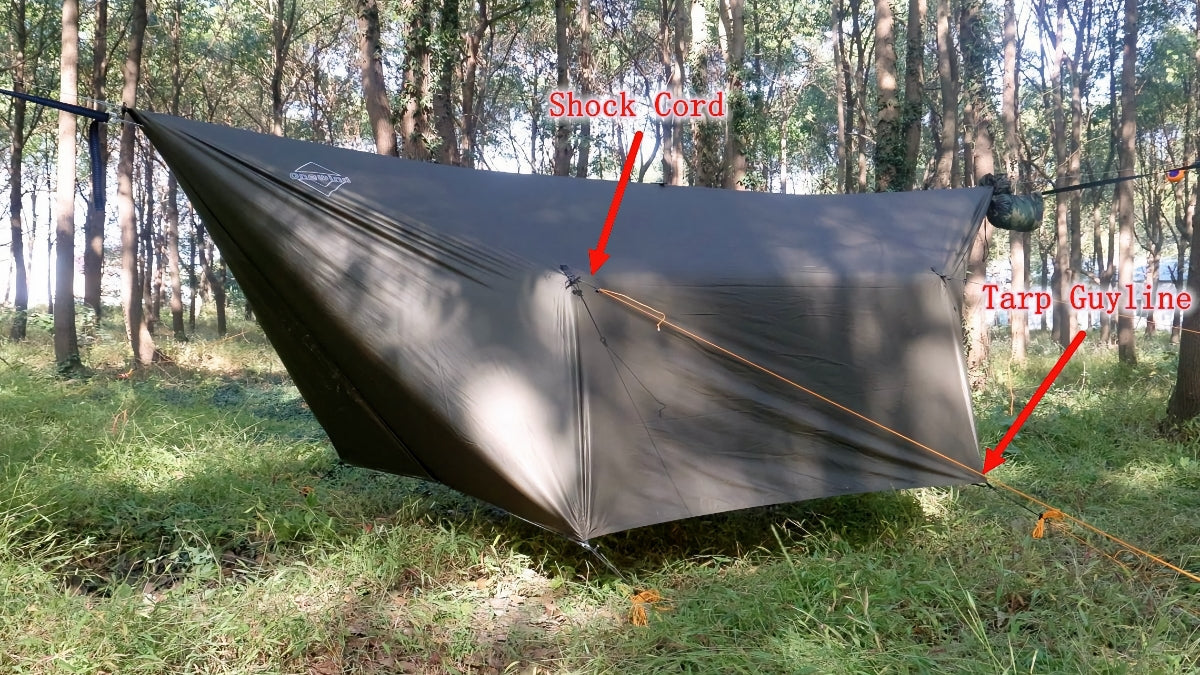
As an avid camper and outdoor enthusiast, I’ve had my fair share of wrangling with tarps and guylines. After numerous camping trips, from serene lakeside retreats to rugged mountain escapades, I’ve learned a trick or two about setting up the perfect campsite. One such trick, which might seem minor but has had a significant impact on my tarp setups, is the integration of shock cord into guylines. Let's delve into why this small adjustment can make a world of difference in your camping experience.
Why Add Shock Cord to Guylines?
1. Tension Management: The primary benefit of using shock cord, a type of elastic cord, is to maintain consistent tension in your guylines. This elasticity absorbs sudden forces caused by wind or weight on the tarp (like rain or snow accumulation), reducing the risk of tearing or dislodging the tarp.
2. Durability of Setup: Continuous strain on the tarp and stakes can lead to wear or failure. Shock cords help by easing the strain, thus extending the life of your equipment.
3. Easy Setup and Adjustment: A taut-line hitch or other adjustable knots on a stretchy cord can make fine-tuning the tension of your tarp a breeze, even for novice campers.
4. Adaptability: The stretchiness allows for some give when moving around under the tarp or when adding/removing objects underneath it, making your shelter more adaptable to different situations.
How to Incorporate Shock Cord in Your Setup
1. Materials Needed:
- Quality shock cord (4-6 mm thickness is typically ideal)
- Guylines (paracord or any sturdy, lightweight cord)
- Tarp with tie-out points
- Tent stakes
2. Step-by-Step Guide:
- Cutting the Shock Cord: Cut a piece of shock cord about 12-18 inches long for each guyline. This length can be adjusted based on the size of your tarp and the expected weather conditions.
- Attaching to the Guyline: Tie one end of the shock cord to the end of your guyline. You can use a simple sheet bend or a double fisherman’s knot for a secure attachment.
- Connect to the Tarp: Tie the other end of the shock cord directly to the tarp's tie-out points, or use a loop knot if you prefer a quick-release system.
- Anchoring: Run the remaining length of the guyline from the shock cord to your stake in the ground. Adjust the length and tension as necessary.
- Fine-Tuning: After staking, adjust the guyline to ensure your tarp is taut and secure. The shock cord should be slightly stretched, indicating it's ready to absorb any extra tension.
3. Tips and Considerations
- Quality of Shock Cord: Invest in a high-quality shock cord that can withstand various weather conditions and won’t lose elasticity over time.
- Knot Knowledge: Knowing a few key knots can help you set up more effectively and adjust your tarp with ease.
- Regular Checks: Always check the tension and integrity of your guylines and shock cords, especially before turning in for the night.
Adding shock cord to your tarp's guylines is a simple yet ingenious way to enhance your camping setup. It not only protects your gear but also provides peace of mind, knowing that your shelter is more secure against the whims of Mother Nature. As you prepare for your next outdoor adventure, consider this little trick – it might just be the detail that elevates your camping experience from good to great.
Introducing Onewind GuyLine Lock Tensioners and Guyline Collection System
The Onewind GuyLine Lock Tensioners are designed to streamline your camping setup. These tensioners work seamlessly with shock cords, providing an easy and efficient way to adjust and secure your tarp. The system is user-friendly and highly effective in maintaining the tension and integrity of your shelter.
Additionally, the Onewind guyline collection system, which includes shock cords, offers a convenient and reliable solution for a quick setup. This integrated system simplifies the process, saving you time and effort in preparing your campsite.
Remember, every small improvement in your camping setup not only enhances comfort but also deepens your connection with the great outdoors. Happy camping!


